Saturday, February 26, 2011

My NEW Homemade Brush Cleaner

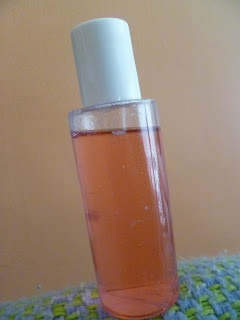
Happy Saturday!! Last night I decided I was going to clean my brushes with a little more than just alcohol and water and make myself a brush cleaner!! I looked online at the many types of brush cleaner and the one that caught my eye was the Mac Brush Cleaner because it was pink. SO I decided to make my homemade brush cleaner PINK!!

Ok, mine came out like this:
A Day in the Life of Rachel
Ok, so to make this I used 3 main products, cheap that you can get at the dollar store and Walmart....

This is from DT:
A Day in the Life of Rachel
 This is from Walmart:
A Day in the Life of Rachel
 and this is from CVS:
A Day in the Life of Rachel
You can use shampoo as well instead of shower gel though I would not recommend dish soap because it left some of my brushes kinda dry...

Also I would add a little bit of leave in conditioner, the clear kind so that you don't have clumpy conditioner throughout your bottle. I added a little bit but I couldn't find it when I went to take pictures :)

I don't think the measurements have to be exact so i just threw in a tablespoon of each ingredient plus a little water and a tip of red coloring that i got in a 'make your own' makeup kit...

Here is a good place for recipies:
http://tipnut.com/homemade-makeup-brush-cleaner/

I am not one to follow a recipie because I prefer to learn from mistakes, the next time I make this brush cleaner I think I will add less alcohol and less baby cologne, more conditioner and more water.

Anyway, hope this kinda helps you! I tried out the brush cleaner after I made it and it did a good job. I use this as a brush cleaner for my face painting brushes and my makeup brushes :)

Love you Followers,
Rachel


Friday, February 25, 2011

A Super Quick Tip: Sharpening any Pencil Liner to a Fine Tip

We all need to know how to sharpen a super creamy pencil liner to a fine tip for more precise applications. I never wanted to buy an expencive sharpener and with this tip you don't have to. You can use any cheap old dollar store sharpener as long as it has the 2 sizes on it:

Like I said, any sharpener will do fine...

Anyway, on to the tip,

To sharpen extremely creamy pencils my first thing is to temporarily harden the tip without altering the formulation. All you really need to do is stick your pencil in the freezer for about 5 munites or the fridge for about 10 minutes. Then you can go in with your sharpener and vuala! You can now SUCCESSFULLY sharpen your super creamy pencil to the finest point possible!

Oh! And BTW you can still line with your eyes with the frozen pencil and it will still be creamy on your eye but it's too cold for me to handle so I let it sit for about 2 min's till it got more like room temp...

I super duper hope this helps you!

<3 Rachel
P.S: Followers make my day :)

Wednesday, February 23, 2011

NEW CHEEK ART DESIGNS!!

YAY!! So, spring is coming which means soon I will be face painting again which means I need to start practicing again. This is more of a hobby for me so I'm allowed to take the winter off :) :)

Anyways, here are some designs that I am adding to my catalogue of designs... hope they provide you with some ideas and if you want a full tutorial on any one of them let me know!

* Flower Design:
A Day in the Life of Rachel
* Shark
A Day in the Life of Rachel
* Rose Design

A Day in the Life of Rachel

* Palm Sunset

A Day in the Life of Rachel

* Cat, in the Moon, on an Branch :)
A Day in the Life of Rachel

*Peace Heart Stencil (Silly Farm)
A Day in the Life of Rachel
* Car Stencil (cut myself)

A Day in the Life of Rachel

*Pink Butterfly

A Day in the Life of Rachel

Thanks for reading!!!!
Followers Make my DAY!!

<3 Rachel

Quick Cheek Art: How to Face Paint a Shark

This is THE most asked for animal among boys and at times girls as well. For boys I'll paint the body blue and for girls ask if they want pink or purple and occasionally I will add a bow. Hope this tutorial helps you!

A Day in the Life of Rachel

Step 1: Outline the body, give it the shape you think it should have.....
A Day in the Life of Rachel
Step 2: Add the nose and back, as you can see I made the bottom of the mouth longer....
A Day in the Life of Rachel
Step 3: Fill in behind where the teeth are going to go, to make a frame for the mouth.....
A Day in the Life of Rachel
Step 4: Add the 3 fins, the tail, the tiny fin at the bottom and another larger one at the top.....
A Day in the Life of Rachel
Step 5: Move on to your white paint and draw in 2 eyes and the mouth....

A Day in the Life of Rachel
Step 6: Move on to your black paint and finnish the eyes, and add gills....
A Day in the Life of Rachel

Step 7: Now you can outline the mouth and add lines for teeth (my favorite part)....
A Day in the Life of Rachel

AND THATS IT!! I think this is just the cutest thing. I got the idea from my Klutz Bros Face Painting book....
Klutz Face Painting Book Kit


THANKS FOR READING! BTW, followers make my day :) :) :)

<3 you all! 
Rachel


Saturday, February 19, 2011

Sally Girl Haul/ Sally Girl Baked Eyeshadows Review

Yay, so I've been wanting to write a review on these shadows for a while now and I'm super glad to finnaly be able to. Lately, I've been just super busy with Pit Orchestra for the musical in which I play the trumpet, gymnastics, jazz band, and just homework and stuff, ugh.

Anyway, I absolutly love these shadows, they are great to use wet or dry and are vibrant even without a base or primer.


A Day in the Life of Rachel

Once I wore the purple wet without a base or a primer and it lasted  
all day with no creasing, but then again it was a pretty easy day,  
just went to the mall.

I had never tried baked eyeshadows before and was mildly confused by  
the texture at first. I did some reasearch and found out that these shadows  
start off as a liquid and are literally  baked in an oven. Obviously  
not like the oven you have at home but a similar concept.

You can get these shadows for .99 cents (or .89 with a sallys card)  
ONLY at Sallys Beauty Supply(store/online) and they are the cutest things ever. The little container is so tiny and cute, I would say about the size of a  
quarter and it's got a little flip open cap and the whole thing  
reminds you of a little bubble... It's great.


I have 3 of their colors: Teal, Purple and Bronze. I love them all! 


A Day in the Life of Rachel

A Day in the Life of Rachel

A Day in the Life of Rachel

A Day in the Life of Rachel


I have swatches and stuff so you can see.
A Day in the Life of Rachel 


At the top are just the shadows and at the bottom they are foiled

I know there are some little like 9 year old girls who have already  
entered the world of makeup and if that is you or your daughter or  
sister or something these are the perfect birthday gift, and at .89  
to .99 cents you can't beat it.

Overall, I would give these a 5 out of 5 because they are great  
product wise and price wise. I plan to buy the other colors soon if  
not today.


Disclaimer: Not sent to me, bought them myself bla, bla, bla.... :)
Hope this review helped you! Thanks to all my followers! Comment please!


Haul Video:


Rachel

Saturday, February 12, 2011

Student Exchange Program: Makeup?!

Ok, so if you didn't already know this, I'm supposed to be an exchange  
student to Thailand next year, my 11th grade year. Already I have been  
thinking about what to pack and it occured to me that they might not  
even sell makeup in Thailand. As it is I am only allowed to pack 2  
luggage bags under 50 pounds and a carry on and a purse. The rest of  
my stuff my parents are going to have to ship to me.

  So, as far as I know so far, clothes should be cheap in Thailand. I  
plan to bring some of my own clothes here but I can leave all my heavy  
winter stuff here cuz it's so hot there.  I wish I knew exactly what  
was available there because then I could know what to bring and what  
not to bring.

I know I'm gonna pack loads of sunscreen, my knife (mabe buy a bigger  
one), enough femenine products to last me a millon years, my journals,  
and my MAKEUP.

I forgot that that was what i was supposed to be talking about. Ok, so  
I have no idea what kind of makeup IF ANY is in thailand and I know it  
would be super duper expencive to have any shiped there so, what do I  
do?

I'm a darker skin tone and will probably become much much darker while  
I am there and I know they won't have no make up for no black people.  
*sigh..... The only thing I can think of doing is packing tremendously  
large quantities of mineral foundation since my black opal will  
probably melt all over my face and buy 20+ of my favorite eyeshadows  
and eyeliners.

I'm probably going to need a rediculouly good primer to resist the  
sweltering heat too...

I plan to post more about the details of my exchange later when I get  
them.

Thanks so much to my followers and please comment!

Rachel

Friday, February 4, 2011

MY NAILS TODAY

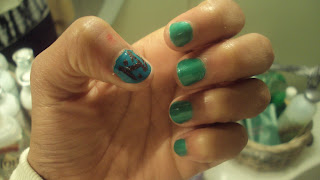
I mixed 4 colors to get this and I LOVE IT. It is a soft metallic neon green that reflects blue in light!
I used 1 metallic blue from Sephora,  1 blue/green from L.A. Colors and 2 other greens, one neon and the other a metallic Sally Hansen HD polish.

Lemme know what you think! FOLLOW!!